
| 일 | 월 | 화 | 수 | 목 | 금 | 토 |
|---|---|---|---|---|---|---|
| 1 | 2 | 3 | 4 | 5 | ||
| 6 | 7 | 8 | 9 | 10 | 11 | 12 |
| 13 | 14 | 15 | 16 | 17 | 18 | 19 |
| 20 | 21 | 22 | 23 | 24 | 25 | 26 |
| 27 | 28 | 29 | 30 |
- torchserve
- FastAPI
- github
- 완전탐색
- NLP
- docker
- rnn
- 알고리즘
- Matplotlib
- pytorch
- wandb
- GCP
- vscode
- Kaggle
- PytorchLightning
- autoencoder
- NaverAItech
- 프로그래머스
- python
- leetcode
- 백준
- 코딩테스트
- Kubernetes
- FDS
- GitHub Action
- DeepLearning
- pep8
- 네이버AItech
- GIT
- datascience
- Today
- Total
Sangmun
deep learning inference 서버 구축하기 - 2 본문
1. torchserve로 huggingface 모델 서빙하기
torchserve는 transformer 모델을 torchserve로 서빙하는 예제를 친절하게 잘 기술해 놓았다.
https://github.com/pytorch/serve/tree/master/examples/Huggingface_Transformers
GitHub - pytorch/serve: Serve, optimize and scale PyTorch models in production
Serve, optimize and scale PyTorch models in production - GitHub - pytorch/serve: Serve, optimize and scale PyTorch models in production
github.com
torchserve로 transformer를 서빙하기 위해 필요한 파일은 다음과 같다.
pytorch로 모델을 저장하면 생성되는 모델 파일 및 설정파일이다.
pytorch_model.bin vocab.txt config.json
하지만 훈련 중인 모델이 없고 모델을 huggingface에서 모델을 다운로드를 하여 서빙을 하고 싶으면 설정파일을 설정하고 아래의 코드를 실행하면 알아서 Transformer_model 디렉터리를 생성하고 필요한 파일들을 해당 경로에 저장을 해준다.
# setup_config.json 파일
# bert-base sequence_classification 모델 다운로드 설정파일
{
 "model_name":"bert-base-uncased",
 "mode":"sequence_classification",
 "do_lower_case":true,
 "num_labels":"2",
 "save_mode":"pretrained",
 "max_length":"150",
 "captum_explanation":true,
 "embedding_name": "bert",
 "FasterTransformer":false,
 "BetterTransformer":false,
 "model_parallel":false
}
이후에 아래의 명령어로 필요한 모델을 huggingface에서 바로 다운로드 할 수 있다.
Download_Transformer_models.py와 setup_config.json파일 모두 torchserve 깃허브에서 제공하고 있으며 Sequence classification 뿐만 아니라 token classification, question answering 등 다양한 예제에 대한 setup_config.json 파일도 제공해 준다.
python Download_Transformer_models.py setup_config.json
다음으로는 아래의 명령를 실행하여 필요한 파일들을 하나로 모아 서빙에 필요한. mar 파일을 생성한다.
위에서 다운로드한 파일 외에 Transformer_handler_generalized.py는 입력으로 받은 데이터와 출력으로 나온 데이터를 전후처리 하기 위한 파일로 원래는 세부적으로 구현이 필요한 사항이나 일단은 예시파일이 제공되길래 그냥 가져다가 썼다.
index_to_name.json 파일은 모델의 출력으로 나온 int32 값을 해당하는 문자열로 매핑해 주는 역할을 하는 설정파일이다.
두 파일 모두 torchserve 깃허브에서 제공이 된다.
torch-model-archiver --model-name BERTSeqClassification --version 1.0 --serialized-file Transformer_model/pytorch_model.bin --handler ./Transformer_handler_generalized.py --extra-files "Transformer_model/config.json,./setup_config.json,./Seq_classification_artifacts/index_to_name.json"
Sequence classification 모델에 해당하는 json파일로 위 경우는 2가지 case 밖에 없다.
#index_to_name.json 예시
{
 "0":"Not Accepted",
 "1":"Accepted"
}
위의 명령어를 실행하고 나면 BERTSeqClassification.mar 파일이 생성이 되며 model_store라는 지정된 경로로 해당파일을 이동해 주고 torchserve를 사용하여 서빙을 시작한다.
mkdir model_store
mv BERTSeqClassification.mar model_store/
torchserve --start --model-store model_store --models my_tc=BERTSeqClassification.mar --ncs
torchserve를 시작하면 출력되는 화면

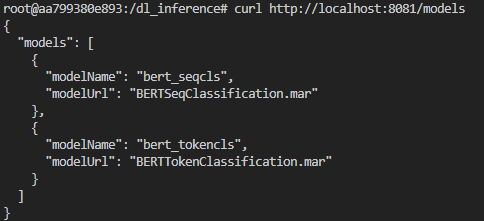
curl 명령어로 해당 모델들이 잘 서빙되는지 확인
curl http://localhost:8081/models/ # 서빙되는 전체 모델 확인
curl http://localhost:8081/models/{model_name} # 각각의 모델 확인
이후 같은 과정으로 서빙을 하고 싶은 다른 모델들의. mar 파일을 만들어준다.
# BertSeqClassification의 version 2를 만드는 명령어
torch-model-archiver --model-name BERTSeqClassification2 --version 2.0 --serialized-file Transformer_model/pytorch_model.bin --handler ./config/Transformer_handler_sequence.py --extra-files "Transformer_model/config.json,./config/setup_config_sequence.json,./config/Seq_classification_artifacts/index_to_name.json"
mv BERTSeqClassification2.mar model_store
두 번째 모델부터는 같은 명령어로 서빙이 안됨으로 그 대신 management api의 register 기능을 사용하여 새로운 모델을 등록해 준다. curl 명령어로 post 요청을 보내면 된다.
curl -X POST "http://localhost:8081/models?url=BERTSeqClassification2.mar&model_name=bert_seqcls"
새로 등록한 모델은 worker가 default로 0개로 지정되는 듯 보여 min_worker를 1개로 지정해 주는 명령어를 전송해 준다.
curl -v -X PUT "http://localhost:8081/models/bert_seqcls/2.0?min_worker=1"
총 4개의 모델이 잘 등록되고 worker를 할당받은 것을 확인하였다.
2. FastAPI로 v2 inference protocol을 준수하는 API 서버 구축
아래와 같이 서버와 모델에 대한 정보 및 추론 결과를 제공하는 API를 구현해야 한다.
* FastAPI에서 요청을 받으면 다시 받은 요청을 기반으로 하여 torchserve로 관련된 요청을 보내서 필요한 정보를 받는 방식으로 구현을 하였다. 즉 api서버에서 또 다른 api서버로 요청을 보내는 것인데 이 방식이 맞는 방식인지 모르겠다.
이 과정에서 동기적으로 작동하는 python의 request 패키지는 사용이 불가능하여 비동기로 request 요청을 보낼 수 있는 함수를 구현하여 사용하였다.
# async get request
async def request(client, url):
    response = await client.get(url)
    return response


async def request_handler(url):
    async with httpx.AsyncClient() as client:
        tasks = request(client, url)
        result = await asyncio.gather(tasks)
        return result[0]

# Health
@app.get("/v2/health/live")
async def health_live():
    response = await request_handler(f"{management_server}/api-description")

    if response.status_code == 200:
        Server_live_response = {"response": "Inference server is alive"}
        return Server_live_response
    else:
        error_handler(response)
* 또한 inferece 부분을 구현하는 과정에서 torchserve로 추론 요청을 하려면 추론하고자 하는 내용을 file의 형태로 전송을 해야 하는 것으로 확인을 하였다. 따라서 FastAPI에서 요청받는 추론 요청 내용을 임시로 파일로 저장해서 해당 파일을 torchserver로 보낸 형식으로 구현을 하였는데 이렇게 구현을 하는 것이 맞는지 모르겠다. 일단 돌아는 간다..
마지막으로 부분적으로 v2 inference protocol을 준수하지 않은 부분이 있다. 예시를 보면 모델 메타데이터에서 input으로 받을 데이터의 형식을 명시하라고 되어있는데 입력으로 받을 tensor의 datatype이나 shape의 정보를 제공해주어야 한다. 하지만 나는 그저 string으로 데이터를 받고 싶은데 해당 부분은 어떻게 처리를 해야 하는지 추후에 알아봐야겠다. 우선은 임의로 string이라고만 하고 처리하였다.
# Inference
@app.post("/v2/models/{model_name}/infer")
async def model_infer(model_name: str, inputstr: InputStr):

    input_json = jsonable_encoder(inputstr)

    file_hash = hash(datetime.now())
    file_path = f"./tmp/{file_hash}.txt"

    with open(file_path, "w") as file:
        file.write(str(input_json))

    url = f"{inference_server}/predictions/{model_name}"
    response = await request_post_handler(url, file_path)

    os.remove(file_path)

    if response.status_code == 200:
        inference_response = {
            "model_name": model_name,
            "id": "tmp_string",
            "outputs": {
                "Positive_negative": {
                    "name": "inference_result",
                    #"shape":[]
                    "datatype":"string",
                    #"parameter":[]
                    "result": response.text,
                }
            },
        }

        return inference_response

    else:
        error_handler(response)
그 외에는 torchserve의 management, inference api의 가이드를 보고 예외에 대한 처리를 해주었다.
management api, inference api 서버 모두 404, 500, 503 에러 케이스만 있다.
def error_handler(response):
    error_message = json.loads(response.text)["message"]

    if response.status_code == 404:
        raise HTTPException(status_code=404, detail=error_message)
    elif response.status_code == 500:
        raise HTTPException(status_code=500, detail=error_message)
    elif response.status_code == 503:
        raise HTTPException(status_code=503, detail=error_message)
3. dockerize 및 github action을 이용한 ci/cd 구축
이제 FastAPI와 torchserve의 구현사항을 dockerize를 구현하는데 사실 torchserve에서 기본적으로 제공하는 docker 이미지가 있음을 좀 나중에 알았다. 다음부터는 공식 document에서 제공하는 이미지를 사용하도록 하자.
내가 만든 dockerfile은 아래와 같으며 torchserve를 사용하기 위해서는 python 3.8 버전 이상이 필요해서 python:3.8-slim-buster를 사용하였다.
FROM python:3.8-slim-buster

# torchserve를 위한 jdk 설치
RUN apt-get update -y \
    && apt-get install -y curl git openjdk-11-jdk

RUN git clone https://github.com/pytorch/serve.git \
    && python ./serve/ts_scripts/install_dependencies.py

WORKDIR /dl_inference

COPY . .
# python package 설치 및
# huggingface model 다운로드 및 .mar file을 만드는 스크립트 실행
RUN pip install --no-cache-dir -r requirements.txt \
    && bash ./model_down_register.sh

ENV server_name="my_server" \
    server_version="1.0" \
    management_server="http://localhost:8081" \
    inference_server="http://localhost:8080"

CMD ["uvicorn", "main:app", "--reload", "--host", "0.0.0.0", "--port", "8000"]
model_down_register.sh는 1번 과정에서 수행한 명령어들을 한 번에 실행하도록 sh 파일을 만들어 놓아 실행하였다.
총 4개의. mar파일을 만들어 model_store에 저장까지 해놓는다. transformer 파일을 직접 다운로드하고 저장함으로 빌드시간도 꽤 걸리고 이미지의 용량도 굉장히 크다...
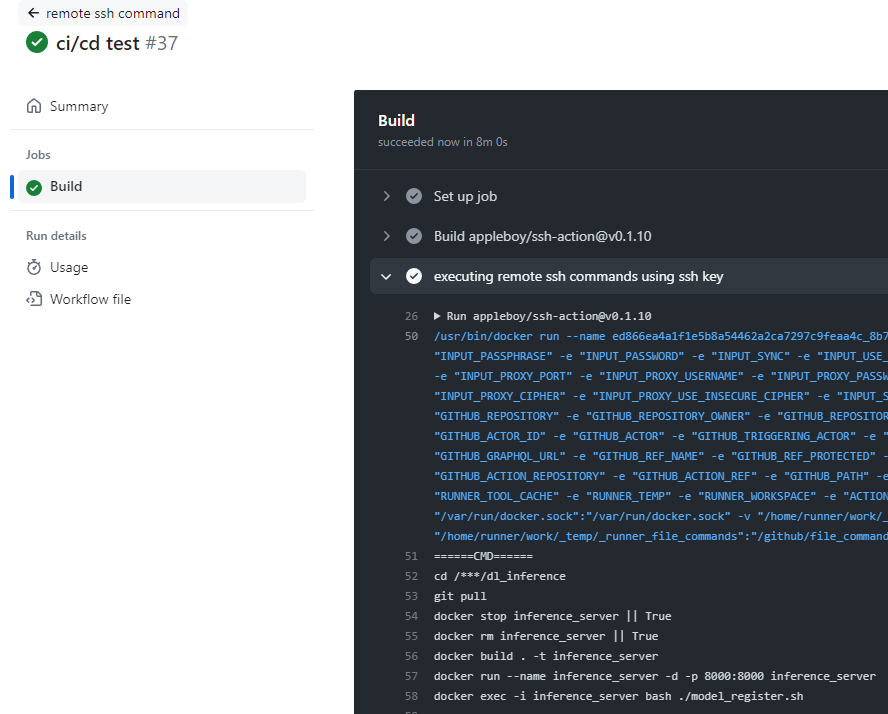
이후 github action을 ssh로 설정을 하여 main branch에 push가 들어올 시 자동으로 docker 파일을 빌드하고 실행하도록 구현하였다.
FastAPI가 쓸 8000번 포트를 만 export 하였으며 model_register.sh파일은 1번 과정에서 모델들을 torchserve에 등록하는 curl post 명령어들을 모아서 실행하였다.
# github action yml파일의 script 부분
script: |
          cd /root/dl_inference
          git pull
          docker stop test || True
          docker rm test || True
          docker build . -t test
          docker run --name test -d -p 8000:8000 test
          docker exec -i test bash ./model_register.sh
github action 실행 시 성공하는 장면
위의 과정을 통하여 FastAPI를 이용하여 deep learning model을 서빙하는 프로젝트를 완료해 보았다. 큰 틀에서는 요구사항을 전부 만족시킨듯하나 세부적인 사항을 일일이 따지만 production level로 운영되기에는 다소 하자가 있는 것 같다. 예를 들면 docker image를 빌드하는 데 걸리는 시간이라든지.... 용량이라든지....
이 부분은 코드 리뷰를 받으면서 보완해 보아야겠다.
issue : tokenclassification은 inference 요청을 보내면 503 error만 반환한다.. 구체적인 원인은 내부의 로그를 봐야지 해결가능할 것 같다.
'개발 > numble 프로젝트' 카테고리의 다른 글
| deep learning inference 서버 구축하기 - 1 (0) | 2023.05.15 |
|---|
