
| 일 | 월 | 화 | 수 | 목 | 금 | 토 |
|---|---|---|---|---|---|---|
| 1 | ||||||
| 2 | 3 | 4 | 5 | 6 | 7 | 8 |
| 9 | 10 | 11 | 12 | 13 | 14 | 15 |
| 16 | 17 | 18 | 19 | 20 | 21 | 22 |
| 23 | 24 | 25 | 26 | 27 | 28 |
- vscode
- leetcode
- autoencoder
- NLP
- 백준
- pytorch
- torchserve
- GCP
- 알고리즘
- docker
- 코딩테스트
- 완전탐색
- pep8
- GitHub Action
- PytorchLightning
- python
- datascience
- Kaggle
- Kubernetes
- NaverAItech
- github
- Matplotlib
- FDS
- FastAPI
- 프로그래머스
- rnn
- 네이버AItech
- GIT
- wandb
- DeepLearning
- Today
- Total
Sangmun
Python Thread의 개념과 사용예시 본문
python에서 thread는 동시성을 가지는 코드를 작성을 위해 필요로 한다. 하지만 multiprocessing과는 다르게 실제로 여러 개의 작업을 동시에 하는 것은 아니다. 단지 하나의 코어로 여러 작업을 왔다 갔다 하면서 동시에 처리하는 것처럼 보일뿐이다.
Thread는 보통 외부의 이벤트를 오래동안 기다려야(I/O bound) 하는 작업에 적용하면 효과적이다. 하지만 많은 CPU연산을 필요로 하는 작업에는 Thread 보단 multiprocessing이 어울린다.
Python Thread의 예시
아래 코드는 main section에서 thread를 하나 생성하여 원하는 함수를 실행하는 코드이다.
threading.Thread 함수안에 target으로 실행하고자 하는 함수와 args에 변수를 넘겨준다.
import logging
import threading
import time

def thread_function(name):
    logging.info("Thread %s: starting", name)
    time.sleep(2)
    logging.info("Thread %s: finishing", name)

if __name__ == "__main__":
    format = "%(asctime)s: %(message)s"
    logging.basicConfig(format=format, level=logging.INFO,
                        datefmt="%H:%M:%S")

    logging.info("Main    : before creating thread")
    x = threading.Thread(target=thread_function, args=(1,))
    logging.info("Main    : before running thread")
    x.start()
    logging.info("Main    : wait for the thread to finish")
    # x.join()
    logging.info("Main    : all done")
출력결과는 아래와 같다. Thread를 생성하여 실행한 thread_function이 main thread보다 늦게 종료된 것을 확인할 수 있다.
$ ./single_thread.py
Main    : before creating thread
Main    : before running thread
Thread 1: starting
Main    : wait for the thread to finish
Main    : all done
Thread 1: finishing
그 이유는 다음과 같다. python에는 daemon thread 라는것이 존재하는데, python에서의 daemon thread는 프로그램이 종료되면 즉시 같이 종료된다. 하지만 그렇지 않은 thread라면 해당 thread가 종료될 때까지 프로그램이 기다리게 된다.
위에서 생성한 thread는 daemon thread가 아닌 thread이며 따라서 프로그램이 해당 thread가 종료될때까지 기다렸다가 종료된 예시이다.
따라서 아래처럼 thread를 생성할때 thread가 daemon thread라는 점을 명시를 해주면
x = threading.Thread(target=thread_function, args=(1,), daemon=True)main thread가 해당 thread를 기다리지 않고 바로 프로그램을 종료해 버리는 기록을 확인할 수 있다.
$ ./daemon_thread.py
Main    : before creating thread
Main    : before running thread
Thread 1: starting
Main    : wait for the thread to finish
Main    : all done
또한 daemon thread가 아닌 thread를 프로그램 종료시에만 기다리지 않고 원하는 지점에서 기다리게 할 수 있다. 그럴 때 사용되는 것이 join() 함수이며 위의 코드에서 x.join()의 주석을 해제하면 x.join() 코드가 있는 지점까지만 main thread가 진행되고 다른 thread를 기다리게 된다.
Thread를 많이 생성하기
아래의 예시 코드는 위의 예시 코드와는 달리 여러개의 thread를 생성하여 작업을 수행하는 코드이며. join() 함수를 사용하여 main thread가 특정 지점에서 다른 thread를 기다리게 만들어 놓은 코드이다.
thread object를 list로 넘여서 각각 start와 join 함수를 사용한것을 확인할 수 있다.
import logging
import threading
import time

def thread_function(name):
    logging.info("Thread %s: starting", name)
    time.sleep(2)
    logging.info("Thread %s: finishing", name)

if __name__ == "__main__":
    format = "%(asctime)s: %(message)s"
    logging.basicConfig(format=format, level=logging.INFO,
                        datefmt="%H:%M:%S")

    threads = list()
    for index in range(3):
        logging.info("Main    : create and start thread %d.", index)
        x = threading.Thread(target=thread_function, args=(index,))
        threads.append(x)
        x.start()

    for index, thread in enumerate(threads):
        logging.info("Main    : before joining thread %d.", index)
        thread.join()
        logging.info("Main    : thread %d done", index)
아래는 실행결과이며 결과를 살펴보면 thread가 실행된 순서되로 종료되지 않았음을 확인할 수 있다. 코드를 실행할 때마다 다른 결과를 확인할 수 있으며 이것은 운영체제에 의해 결정되는 사항으로 결과를 예측하기는 매우 어렵다.
$ ./multiple_threads.py
Main    : create and start thread 0.
Thread 0: starting
Main    : create and start thread 1.
Thread 1: starting
Main    : create and start thread 2.
Thread 2: starting
Main    : before joining thread 0.
Thread 2: finishing
Thread 1: finishing
Thread 0: finishing
Main    : thread 0 done
Main    : before joining thread 1.
Main    : thread 1 done
Main    : before joining thread 2.
Main    : thread 2 done
같은 역할을 하는 코드를 ThreadPoolExecutor class를 context manager를 이용하여 작성이 가능하다.
context manager의 with 블록이 ThreadPoolExecutor 각각의 thread에 join함수를 자동으로 적용시켜 주어서 안전하게 thread를 사용할 수 있다.
import concurrent.futures

# [rest of code]

if __name__ == "__main__":
    format = "%(asctime)s: %(message)s"
    logging.basicConfig(format=format, level=logging.INFO,
                        datefmt="%H:%M:%S")

    with concurrent.futures.ThreadPoolExecutor(max_workers=3) as executor:
        executor.map(thread_function, range(3))
Race Condition
Race condition은 thread를 사용하다 마주칠 수 있는 문제로 두개 혹은 그 이상의 thread가 공유된 데이터나 자원에 접근할 때 발생할 수 있는 문제이다.
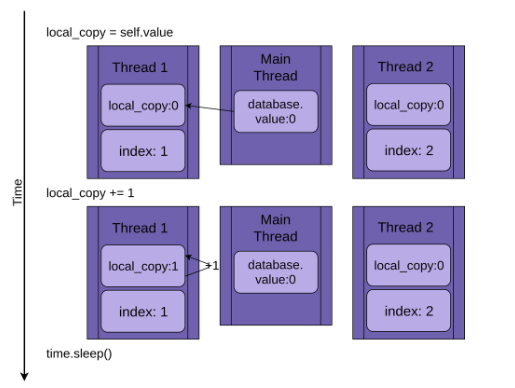
아래와 같은 코드가 있다고 해보자. main section에서 thread를 2개 생성하여서 각각의 thread가 FakeDatabase의 value를 하나씩 증가시키면 우리는 최종적으로 self.value의 값이 2가 될 것으로 기대를 한다.
class FakeDatabase:
    def __init__(self):
        self.value = 0

    def update(self, name):
        logging.info("Thread %s: starting update", name)
        local_copy = self.value
        local_copy += 1
        time.sleep(0.1)
        self.value = local_copy
        logging.info("Thread %s: finishing update", name)

if __name__ == "__main__":
    format = "%(asctime)s: %(message)s"
    logging.basicConfig(format=format, level=logging.INFO,
                        datefmt="%H:%M:%S")

    database = FakeDatabase()
    logging.info("Testing update. Starting value is %d.", database.value)
    with concurrent.futures.ThreadPoolExecutor(max_workers=2) as executor:
        for index in range(2):
            executor.submit(database.update, index)
    logging.info("Testing update. Ending value is %d.", database.value)
하지만 실제로 코드를 동작시키면 self.value의 값은 1로 확인이 된다.
$ ./racecond.py
Testing unlocked update. Starting value is 0.
Thread 0: starting update
Thread 1: starting update
Thread 0: finishing update
Thread 1: finishing update
Testing unlocked update. Ending value is 1.
그 원인은 다음과 같다. 첫번째첫 번째 thread가 self.value의 값(0)을 local_copy로 복사해서 1을 증가시킨 후 다시 값을 self.value에 저장하지 않고 sleep에 들어간다. 첫 번째 thread가 sleep에 들어간 사이 두 번째 thread가 똑같이 self.value를 local_copy로 복사해서 1을 증가시키고 sleep에 들어간다. 이후 sleep이 끝난 첫 번째 thread가 값(1)을 다시 self.value에 복사를 하고 두 번째 thread도 같은 행위를 하면서 똑같은 값인 1을 self.value에 복사하게 되는 것이다.
즉 첫번째 thread와 두 번째 thread가 연계되지 않고 각각 self.value의 값을 가져와서 증가시킨 후 각자 다시 값을 복사해 놓은 결과인 것이다.


Lock을 이용한 동기와와 DeadLock
위에 서술된 문제를 해결하기 위한 개념이 Lock이다. 즉 각각의 thread가 서로 동기화 되서 작업을 하게 만드는 기능이다.
Lock은 다른 프로그래밍 언어에서는 mutex라고 불리며 MUTual EXclusion이라는 의미이다.
Lock object는 마치 입장권처럼 동작으로 하며 하나의 시점에는 오직 하나의 thread만이 Lock을 획득할 수 있다.
보통은 lock.acquire(), lock.release() 함수로 Lock을 획득하거나 해제할 수 있다.
위의 예시에서는 아래처럼 코드를 수정하면 race condition 문제를 해결할 수 있다. .acquire()와 .release() 대신에 context manager를 사용한 예시로 하나의 thread가 self.value값에 접근하여 조작한 값을 다시 self.value에 저장할 때까지 다른 thread는 self.value값에 접근할 수가 없다.
class FakeDatabase:
    def __init__(self):
        self.value = 0
        self._lock = threading.Lock()

    def locked_update(self, name):
        logging.info("Thread %s: starting update", name)
        logging.debug("Thread %s about to lock", name)
        with self._lock:
            logging.debug("Thread %s has lock", name)
            local_copy = self.value
            local_copy += 1
            time.sleep(0.1)
            self.value = local_copy
            logging.debug("Thread %s about to release lock", name)
        logging.debug("Thread %s after release", name)
        logging.info("Thread %s: finishing update", name)
아래는 해당 코드를 실행한 결과이다.
$ ./fixrace.py
Testing locked update. Starting value is 0.
Thread 0: starting update
Thread 1: starting update
Thread 0: finishing update
Thread 1: finishing update
Testing locked update. Ending value is 2.
DeadLock은 lock을 잘못사용 하는 경우로 한 시점에는 하나의 thread만 Lock을 획득할 수 있는데 두개 이상의 thread가 서로 Lock을 획득하려 하기만 하고 release는 하지 않아서 작업이 병목현상에 빠지는 현상이다.
아래의 코드를 실행하면 마치 프로그램이 무한 루프에 빠진것처럼 "before second acquire"에서 더 이상 진행되지 않는다.
import threading

l = threading.Lock()
print("before first acquire")
l.acquire()
print("before second acquire")
l.acquire()
print("acquired lock twice")
출처 : https://realpython.com/intro-to-python-threading/#basic-synchronization-using-lock
An Intro to Threading in Python – Real Python
In this intermediate-level tutorial, you'll learn how to use threading in your Python programs. You'll see how to create threads, how to coordinate and synchronize them, and how to handle common problems that arise in threading.
realpython.com
'개발' 카테고리의 다른 글
| python 동시성에 대한 정리 (0) | 2023.03.07 |
|---|---|
| python Producer-Consumer(생산자 소비자 문제) Threading (0) | 2023.03.07 |
| Google cloud Compute Engine에서 인스턴스 만들기 (0) | 2023.02.11 |
| Docker compose (0) | 2023.02.04 |
| Docker 기본 명령어 정리 (0) | 2023.02.04 |

